
ADVANTIX T570 - Film camera KODAK - Free user manual and instructions
Find the device manual for free ADVANTIX T570 KODAK in PDF.

| Product type | APS film camera (Advanced Photo System) |
| Brand | KODAK |
| Model | ADVANTIX T570 |
| Film type | KODAK ADVANTIX film (color or black and white) |
| Lens | KODAK EKTRANAR motorized autofocus, 28 mm, f/3.5, glass lenses |
| Focus | Active system, 130 zones, from 0.4 m to infinity |
| Built-in flash | KODAK SENSALITE, retractable, range (ISO 200): 0.4 m to 5.5 m |
| Photo formats | Classic (C), Group/HDTV (H), Panoramic (P) |
| Power supply | 1 KODAK KCR2 3V lithium battery (or equivalent) |
| Dimensions | 91.8 mm x 60.9 mm x 33.8 mm |
| Weight (without battery or film) | 118 g |
| Self-timer | Approximately 10-second delay, cancelable |
| Data imprinting | Date, time and title (10 titles, 6 languages) on back of photos |
| Flash modes | Auto, fill-in, off, night view |
| Infinity focus | Yes, for distant scenes |
| Double exposure protection | Yes, film status indicator reading |
| Film loading | Instant, simple, with APS cassette |
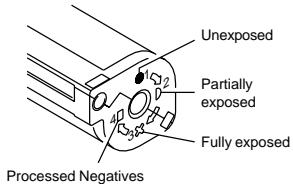
| Film status indicator | Indicator on cassette: unexposed, partially exposed, exposed, processed |
| Lens maintenance | Blower then soft lint-free cloth, no abrasive products |
| Safety | Do not disassemble camera, use recommended battery, dispose of according to regulations |
| Compatible accessories | Tripod (standard socket), strap included |
Frequently Asked Questions - ADVANTIX T570 KODAK
User questions about ADVANTIX T570 KODAK
0 question about this device. Answer the ones you know or ask your own.
Ask a new question about this device
Download the instructions for your Film camera in PDF format for free! Find your manual ADVANTIX T570 - KODAK and take your electronic device back in hand. On this page are published all the documents necessary for the use of your device. ADVANTIX T570 by KODAK.
USER MANUAL ADVANTIX T570 KODAK
Go to our web site at http://www.kodak.com or call:
Kodak (Canada only) from 8:00 a.m. to 5:00 p.m. (Eastern time) Monday through Friday at 1 (800) 465-6325, ext. 36100; for the Toronto area, call (416) 766-8233, ext. 36100.
Kodak (USA only) from 9:00 a.m. to 7:00 p.m. (Eastern time) Monday through Friday at 1 (800) 242-2424.
When you call, please have your camera available.
For warranty purposes, please keep your sales receipt as proof of the date of purchase.
CONTENTS
CAMERA FEATURES AND BENEFITS ....3
GETTING STARTED 5
Loading the battery 5
Date and time. 5
Setting the date. 5
Setting the time 6
Attaching the camera strap 7
CONTROL-BUTION ACTUATOR 8
OTHER BATTERY INFORMATION 8
Low-battery indicator 8
Battery tips 8
Power shut-off 9
LOADING THE FILM 10
TAKING PICTURES 11
Typical print sizes (forms) 12
Using the focus lock. 13
Tips for better pictures 14
FLASH AND PICTURE
TAKING OPTIONS 14
Flash/camera-ready lamp indicator 15
Auto flash 15
Fill flash 15
Flash off 15
Nightview 15
Infinity focus 16
Selecting the flash and picture-taking options 16
Flash/warning-lamp signals 16
Flash-to-subject distance 17
USING THE SELF-TIMER 17
SETTING THE PRINT TITLE AND LANGUAGE. 18
Title-select list 19
Language-select list. 19
UNLOADING THE FILM 19
Automatic rewind. 19
Manual rewind 20
CARING FOR YOUR CAMERA 20
TROUBLESHOOTING 21
SPECIFICATIONS 23
CAMERA FEATURES AND BENEFITS
Three Print Formats
- You can take three different size pictures: Classic (C), Group/HDTV (H), and Panoramic (P) pictures from the same film cassette. The viewfinder changes to show the selected picture size.
Picture Quality Information Exchange (PQix)
This camera records vital scene data on the film's magnetic information strip and communicates that information to the photo lab to optimize lighting and color for better-looking prints.
Date, Time, and Title Imprinting
- The date, time, and cassette ID number are printed on the back of your prints, which makes it easy to organize pictures and order reprints. You can choose from one of 10 preprogrammed titles (6 languages available) to print on the back of the prints. See your photofinisher for a full description of the available services.
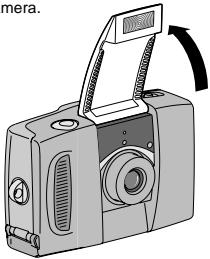
Flip Flash
- The extension of the flash helps to minimize red eyes in flash pictures and prevents hand obstruction in front of the flash. When the flash is closed, it protects the lens and viewfinder.
Double Exposure Protection (DEP)
- You don't need to worry about accidentally re-exposing your film. Your camera reads the Film Status Indicator (FSI) on the film cassette to prevent re-exposure.
Easy, Drop-in Loading
- Easy, drop-in loading is fast and virtually error-free, eliminating blank rolls and double exposures. The camera uses KODAK ADVANTIX Film. The film cassette, unlike the traditional 35mm cartridge, becomes the carrier and storage container for the processed film.
Film Status Indicator (FSI)
- A highlighted indicator advances from one symbol to another to identify the status of the film inside the cassette.

Look for this logo to be certain that the film you buy is made for this camera.

Look for this logo to select a certified photofinisher for developing your film and to assure that you get all the features of the Advanced Photo System.
GETTING STARTED
Loading the battery
This camera uses one 3V lithium KODAK KCR2 (or equivalent) Battery that supplies power for all camera operations.
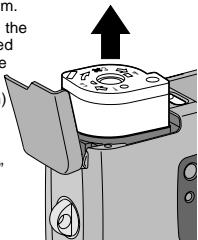
- Open the battery door (19).
- Before you remove the old battery, close the lens cover/ flash.
- Insert the battery into the chamber as shown.
- Snap the battery door closed.
- After you load a new battery into the camera, you will n and time.
Date and time
This camera has a quartz clock and automatic calendar through the year 2040. It uses the film's magnetic data-recording capability to record date and time information which your photofinisher imprints on the back of your prints.
Setting the date
You can choose from three formats: month/day/year, day/month/year, or year/month/day.
- Completely lift up the Lens cover/ flash (2) to raise the flash and to turn on the camera.
- Repeatedly press MENU (13) until the blinking "date format" of your choice appears on the LCD panel (9).
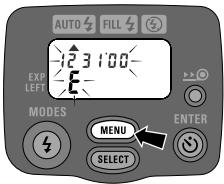
-
The blinking "E" indicates there is no film in the camera.
-
Press ENTER (14) to set the format.
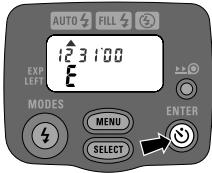
-
If the camera is already at this format, you can bypass this step.
-
Press SELECT (18) to actuate the setting for month.
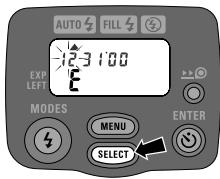
- Repeatedly press and/or hold SELECT to select the new number for month.
- Press ENTER (14) to set the month and to actuate the setting for day.
- Press ENTER again if you want to end the selection.
- Follow steps 4 and 5 to finish setting the date.
Setting the time (hour/minutes)
The camera has a 12-hour clock with PM display.
-
Completely lift up the Lens cover/ flash (2) to raise the flash and to turn on the camera.
-
Repeatedly press MENU (13) until the time appears on the LCD panel (9).
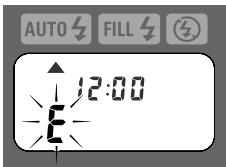
- Press SELECT (18) to actuate the setting for hour.
- Repeatedly press and/or hold SELECT to select the new number for hour.
- Press ENTER (14) to set the hour and to actuate the setting for minutes.
- Follow steps 3 and 4 to finish setting the time.
- The camera automatically defaults to the date setting but you can view the time by pressing MENU.
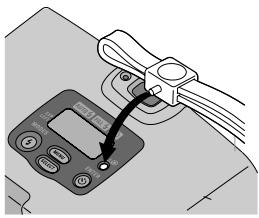
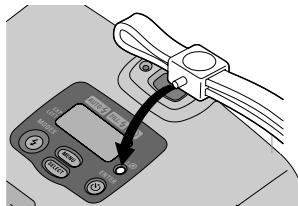
Attaching the camera strap
- Insert the shorter looped end of the strap behind the Strap post (8).

- Thread the longer end of the strap through the shorter loop.

CONTROL-B BUTTON ACTUATOR
You can use the knob on the clasp of the camera strap to actuate the small control buttons on the camera.
OTHER BATTERY INFORMATION
Low-battery indicator

It's time to replace the battery when
- the Battery symbol (34) "blinks" on the LCD panel (9) or
- none of the indicators, except for a steady battery symbol, appears on the LCD panel and the Shutter button (1) cannot be operated.
Battery tips
- Dispose of battery according to local and national regulations.
- Keep a spare battery with you at all times.
- Read and follow all warnings and instructions supplied by the battery manufacturer.
- Keep batteries away from children.
-
Do not try to take apart, recharge or short circuit the battery, or subject it to high temperature or fire.
-
Store the battery in its original packaging prior to use.
- Do not use rechargeable batteries.
- Remove the battery from the camera when the camera is not going to be used for an extended length of time.
- In the unlikely event that battery fluid leaks onto your skin, contact your local health care provider. In the U.S., contact Kodak Health, Safety and Environment Information at 1-716-722-5151.
- In the unlikely event that battery fluid leaks inside the camera, contact your local Kodak Customer Service representative. In the U.S., customers can contact the Kodak Information Center (KIC) at 1-800-242-2424.

Automatic Energy Saving Features
Power shut-off
To conserve battery power, the camera automatically goes to sleep if it is not operated for more than 212 minutes. You can press any of the control buttons, except for the print-format switch, or close and reopen the Lens cover/flash (2) to awaken the camera. When the camera is not used for an extended time, close the lens cover/flash to completely turn off the camera.
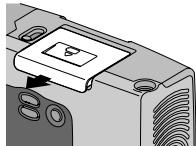
LOADING THE FILM
You can load film into the camera with the camera on or off.
- Turn the camera upside down and move the Film-door switch (17) to open the Film door (15).
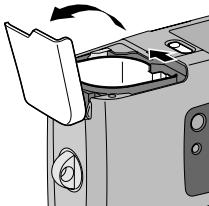
-
The safety interlocked film door opens only when the film chamber is empty or the film in the camera is completely rewound into the film cassette.
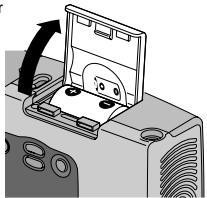
-
Insert the film cassette completely into the Film chamber (16).
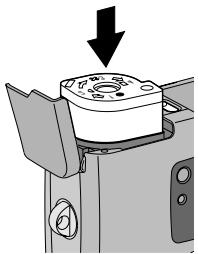
Make sure the Film Status Indicator (FSI) on the film cassette is at (#1 position) for a new cassette.
- Do not force the film cassette into the film chamber.
-
Close the film door to start the automatic film advance.
-
The Picture counter (35) on the LCD panel (9) shows the number of pictures remaining on the film.
TAKING PICTURES
You can take Classic (C), Group/HDTV (H)^* and Panoramic (P) pictures on the same film cassette. Your photoprocessing cost may be based on the format size(s) that you use to expose the film.
-
Completely lift up the Lens cover/ flash (2) to raise the flash and to turn on the camera.
-
The ISO film speed briefly appears on the LCD panel followed by the date.

- Frame your subject within the Viewfinder eyepiece (11). For a sharp picture, stand at least 1.3 ft (0.4m) from your subject.
- Slide the Print-format switch (3) to select the desired format (C, H, or P). The viewfinder changes to show the selected picture size.
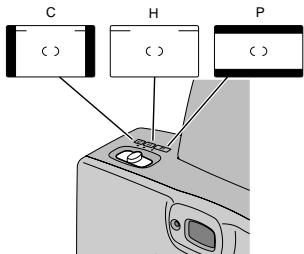
See the Typical print sizes (formats) on page 12.
- Partially press down the Shutter button (1).
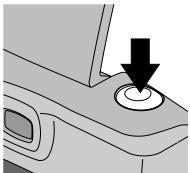
- When the Flash/ camera-ready lamp (10) glows green, fully press down the shutter button to take the picture.
See the Flash/ warning-lamp signals on page 16.
Typical print sizes (forms)
| C | H | P |
| Classic | Group (HDTV) | Panoramic |
| 3.5 x 5 in. or 4 x 6 in. | 3.5 x 6 or 4 x 7 in. | 3.5 x 8.5 in. to 4 x 11.5 in. |
| (88.9 x 127 mm or 102 x 152 mm) | (88.9 x 152 mm or 102 x 178 mm) | (88.9 x 216 mm to 102 x 292.7 mm) |
NOTE: Your photofinisher generally provides 4 × 6, 4 × 7 , and 4 × 11.5 in. (102 x 152, 102 x 178, and 102 x 292.7 mm) sizes. Some local printers may offer 3.5 × 5, 3.5 × 6 , and 3.5 × 8.5 in. (88.9 x 127, 88.9 x 152, and 88.9 x 216 mm) sizes.
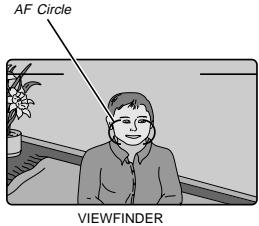
Using the focus lock
This camera automatically focuses on whatever is within the Auto Focus (AF) circle of the viewfinder eyepiece. To get a sharp picture, make sure the AF circle is on your main subject. If you want to take the picture with the subject positioned outside of the AF circle, use the focus lock as follows:
- Place the AF circle on the subject that you want focused in the picture.
-
Partially press down and hold the Shutter button (1) to lock the focus position.
-
While still partially pressing down on the shutter button, move the camera until your subject is where you want it within the Viewfinder eyepiece (11).

- Press the shutter button completely down to take the picture.
Tips for better pictures
- Move close enough to your subject so it fills the viewfinder but not closer than 1.3ft(0.4m)
Take pictures at the subject's level. Kneel down to take pictures of children and pets. - Hold your camera vertically to capture tall, narrow subjects, such as a waterfall, skyscraper, or a single person.
- Add interest to your picture by framing it with a tree branch, a window, or even the rails of a fence.
- Keep the sun behind you. This provides the best subject illumination.
- Stand at an angle to shiny surfaces like windows or mirrors to avoid flash reflection and bright spots in your pictures.
- Turn on all room lights and have your subject look at the flash to reduce red eyes in flash pictures.
FLASH AND PICTURETAKING OPTIONS
Besides the auto-flash mode (default setting of the camera), you can select fill flash, flash off, infinity focus without flash, and nightview with flash.
Repeatedly press MODEs (20) to select the flash mode that best suits your subject and surroundings or a picture-taking mode that lets you tailor the camera's fully automatic settings.
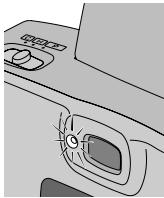
Flash/camera-ready lamp indicator
When you partially press down the Shutter button (1) and the Flash/camera-ready lamp (10) glows green, the flash is fully charged and ready for you to take pictures.
Auto flash
AUTO
In dim light, such as indoors or outdoors in heavy shade, or on dark overcast days, you need flash. Your camera features an automatic flash that fires when you need it. The flip-up flash helps to minimize red eyes in flash pictures and prevents hand obstruction in front of the flash.
Fill flash
FILL
When in bright sun or when bright light comes from behind the subject, dark shadows (especially on faces) may occur. Use fill flash to lighten these shadows and to add sparkle to your subject's eyes.
Flash off

When you do not want to use the flash, especially indoors where flash is prohibited, or to capture the ambiance of existing light, use the flash-off feature. Use a tripod or place the camera on another firm support, and use high-speed film because the shutter speed in these situations will most likely be slow.
Nightview

In this mode, the camera balances the flash and existing light exposure so you can take beautiful pictures of people at sunset or at night. Use a tripod or place the camera on another firm support, and use high-speed film because the shutter speed at night will most likely be slow.
Infinity focus

Capture sharp, distant scenery when you take pictures outdoors during the day or through windows.
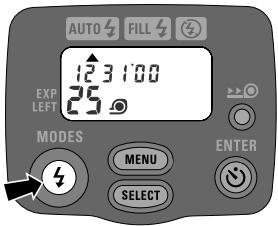
Selecting the flash and picture-taking options
- Completely lift up the Lens cover/ flash (2) to raise the flash and to turn on the camera.
-
Keep the subject within the distance range for the speed of film in your camera (see Flash-to-subject distance table on page 17).
-
Don't take pictures beyond the maximum distance or your pictures will be dark.
-
Repeatedly press MODEs (20) until the Mode-selector arrow (26) points to the Auto-flash indicator (23). Fill-flash indicator (24) or Flash-off indicator (25), or until the Infinity-focus indicator (28) or Nightview indicator (29) appears on the LCD panel (9).
-
Frame your subject within the Viewfinder eyepiece (11).
- Partially press down the Shutter button (1). When the Flash/camera-ready lamp (10) glows green, fully press down the shutter button to take the picture.
The flash, infinity-focus, and nightview modes remain selected after you take the picture. To cancel the selection, press MODES to select another setting or close and reopen the lens cover/flash to automatically return to the default setting.
Flash/warning-lamp signals
| Lamp Indicator | Situation |
| Glows green | • Flash fully charged |
| Glows red* | • Subject closer than 1.3 ft (0.4 m) |
| "Blinks" red* | • Flash not fully charged • Camera movement |
See the TROUBLESHOOTING table for more information.
Flash-to-subject distance
| ISO film speed | Flash-to-subject distance |
| 50 | 1.3 to 9 ft (0.4 to 2.7 m) |
| 100 | 1.3 to 13 ft (0.4 to 4.0 m) |
| 200 | 1.3 to 18 ft (0.4 to 5.5 m) |
| 400 | 1.3 to 26 ft (0.4 to 7.9 m) |
| 800 | 1.3 to 36 ft (0.4 to 11 m) |
| 1600 | 1.3 to 52 ft (0.4 to 15.8 m) |
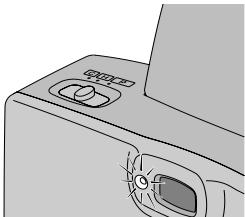
USING THE SELF-TIMER

Use this feature to include yourself in pictures.
- Use the Tripod socket (21) to attach the camera to a tripod or place it on another firm support.
- Completely lift up the Lens cover/ flash (2) to raise the flash and to turn on the camera.
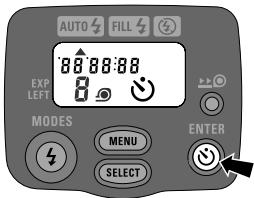
-
Press ENTER (14).
-
The Self-timer indicator (31) appears on the LCD panel (9).
- Look through the Viewfinder eyepiece (11) to compose the picture and to allow room for yourself in it.
- Press the Shutter button (1).
-
Quickly position yourself in the composed picture making sure that you see the Self-timer lamp (4).
-
The self-timer lamp on the front of the camera blinks for approximately 10 seconds before the picture is taken.
- To cancel the self-timer selection before the shutter releases, press ENTER twice or close the lens cover/flash.
- The self-timer automatically turns off after the shutter releases.
SETTING THE PRINT TITLE AND LANGUAGE

You can choose a print title from one of
10 pre-programmed titles and a language (6 options) before you take the picture.

The title you select is recorded on the film's magnetic data strip. At certified Advanced Ph
System labs, the title is printed on the back of your photograph.
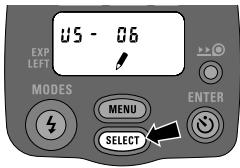
- Repeatedly press MENU (13) until the Title-select indicator (32) appears on the LCD panel (9).
- Press SELECT (18).
The "title-select indicator" and the No-title (cancel title) designator " - " blinks.
- Repeatedly press and/or hold SELECT to select a title number. See the Title-select list on page 19.
-
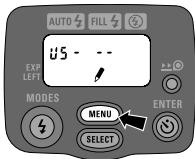
Press ENTER (14) to set the title and to start the language setting.
-
The language code "US" and the "title-select indicator" blinks.
-
Repeatedly press SELECT to select the language code. See the Language-select list on page 19.
-
Press ENTER to set the language and end your selection.
The print title/language remains selected after you take the picture.
To cancel the title for subsequent pictures, follow steps 1 through 3, but for step 3, select No title (cancel title) "_" or select a different title.
Title-select list
The following table lists the title numbers for the in-the-camera-stored titles.
| Title number | Title |
| 01 | Birthday |
| 02 | Vacation |
| 03 | Wedding |
| 04 | Graduation |
| 05 | Congratulations |
| 06 | Christmas |
| 07 | Holiday |
| 08 | I Love You |
| 09 | Party |
| 10 | Family |
| -- | No title (cancel title) |
Language-select list
| Language code | Language |
| US | US English |
| Eng | UK English |
| FrlA | French |
| ESP | Spanish |
| dEU | German |
| JP | Katakana |
UNLOADING THE FILM
Automatic rewind
The camera automatically rewinds the film into the cassette after the last exposure.
-
Wait for the film to completely rewind into the film cassette and for the motor to stop running.
-
When the motor stops running, the Picture counter (35) indicates "0."
-
Move the Film-door switch (17) to open the Film door (15).
-
Remove the film cassette from the camera and reload with new KODAK ADVANTIX Film.
The FSI on the fully-exposed film cassette is at ±bx (#3 position) and the picture counter displays "E."
Manual rewind
If you do not want to take pictures on the entire film, you can manually start the automatic rewind.
- Gently press the Film-rewind button (12) with the control-button actuator on the camera strap to start the automatic rewind.
- See Automatic rewind, steps 1 through 3.
NOTE: You cannot reload partially exposed film into this camera and continue to take pictures.
CARING FOR YOUR CAMERA
- Protect the camera from dust, moisture, sudden impact, and excessive heat.
CAUTION: Do not use solvents or harsh or abrasive cleaners on the camera body.
- If the lens appears dirty, breathe on it to form a mist and wipe the surface gently with a soft, lintless cloth or a camera lens-cleaning tissue. Never wipe a dry lens.
CAUTION: Do not use solvents or solutions not designed for cleaning camera lenses. Do not use chemically treated tissues intended for cleaning eyeglasses.
- Remove the battery when you store the camera for an extended time.
CAUTION: To prevent possible damage and electrical shock, do not attempt to disassemble or repair the camera or flash unit by yourself.
TROUBLESHOOTING
| What happened | Probable cause | Solution |
| Camera will not operate | Battery weak, dead, missing, or improperly loaded | Replace or reload the battery |
| Lens cover/flash closed | Open lens cover/flash | |
| Film does not advance or rewind | Battery weak, dead, missing, or improperly loaded | Replace or reload the battery |
| LCD panel is blank | Battery weak, dead, missing, or improperly loaded | Replace or reload the battery |
| Camera in sleep mode | See Power shut-off on page 9 | |
| Lens cover/flash closed | Open lens cover/flash | |
| Shutter button will not operate | Lens cover/flash closed | Open lens cover/flash |
| Flash/camera ready lamp "blinks" red | Flash not fully charged | Wait for lamp to glow green |
| Insufficient light | Use fill-flash feature and recompose picture | |
| Camera movement | Hold camera steady | |
| Flash/camera ready lamp glows red and shutter button locks | Subject between 10 in. (25.4 cm) and 14 in. (35.6 cm) from camera | Move back and recompose picture |
| Film-presence indicator "blinks" on LCD panel | Loaded exposed (X), partially exposed (Y), or processed film (■) into the camera | Load only new film (●) into the camera |
| Film door does not open | Film cassette loaded in film chamber | Press the rewind button (see Manual rewind on page 20) or continue taking pictures |
SPECIFICATIONS
Film type: KODAK ADVANTIX Film for color and black-and-white pictures
Lens: Autofocusing 28mm motorized, f/3.5, all-glass KODAK EKTANAR Lens
Focus system: 130 zones, active AF
Focus range: 1.3 ft (0.4 m) to infinity
Viewfinder: Real image with C, H, & P format display
Film-speed: DXIX (ISO) 50-1600 for color and black-and-white films
Flash unit: Built-in, KODAK SENSALITE™ Flash
Flash range (ISO 200): 1.3-18 ft (0.4-5.5 m)
Apertures: f / 3.5 - f / 11
Shutter: Programmed, full-aperture shutter 1/4-1/500 seconds
Power source: Main power: one 3 V lithium KODAK KCR2 (or equivalent) Battery
Dimensions: 3.6 × 2.4 × 1.3 in (91.8 x 60.9 x 33.8 mm)
Weight: 4.2 oz. (118 gm) without film or battery

ADVANCED
- CONTENTS
- CAMERA FEATURES AND BENEFITS
- Three Print Formats
- Picture Quality Information Exchange (PQix)
- Date, Time, and Title Imprinting
- Flip Flash
- Double Exposure Protection (DEP)
- Easy, Drop-in Loading
- Film Status Indicator (FSI)
- GETTING STARTED
- Loading the battery
- Date and time
- Setting the date
- Setting the time (hour/minutes)
- Attaching the camera strap
- CONTROL-B BUTTON ACTUATOR
- OTHER BATTERY INFORMATION
- Low-battery indicator
- Battery tips
- Power shut-off
- LOADING THE FILM
- TAKING PICTURES
- Typical print sizes (forms)
- Using the focus lock
- Tips for better pictures
- FLASH AND PICTURETAKING OPTIONS
- Flash/camera-ready lamp indicator
- Auto flash
- AUTO
- Fill flash
- FILL
- Flash off
- Nightview
- Infinity focus
- Selecting the flash and picture-taking options
- Flash-to-subject distance
- USING THE SELF-TIMER
- SETTING THE PRINT TITLE AND LANGUAGE
- Title-select list
- Language-select list
- UNLOADING THE FILM
- Automatic rewind
- Manual rewind
- CARING FOR YOUR CAMERA
- SPECIFICATIONS
- ADVANCED
Brand : KODAK
Model : ADVANTIX T570
Category : Film camera